What Is Cleaning in Place (CIP)? Full Cycle Design, Automation & Compliance Guide
What Is CIP?
Cleaning in Place (CIP) means exactly that: Cleaning equipment without taking it apart.
What’s NOT CIP?
If you’re dismantling systems or sub-components to clean them elsewhere, that’s Cleaning out of Place (COP).
Why CIP Matters:
✅ Removes previous batch residues
✅ Speeds up production cycles
✅ Cuts downtime
But CIP only works if it’s fully automated and tightly controlled. No shortcuts.
Effective Cleaning = Proven Cleaning
You have to PROVE the system is clean.
That’s where cleaning validation comes in. It’s the gold standard for demonstrating your CIP process actually works.
In this guide, we’re focusing on one thing: Clean In Place (CIP).
Table of Content
Typical Cleaning In Place Cycle Steps
CIP is carried out after completion of a batch for equipment to remove the product-related residue (typically called soiling).
After every batch, residue stays behind. That’s your signal: time to CIP.
But here’s the catch: no two cleaning cycles are the same. Because no two products are.
Your cleaning procedure needs to be custom-built. Every time.
Here’s what changes:
💧 Water for Injection (WFI): used in biosimilars, sterile injectables, parenterals.
💧 Purified Water (PW): standard for API-based formulations.
💧 Potable Water (PoW): for intermediates and low-risk products.
The takeaway?
Cleaning steps vary. Utilities vary.
But your goal never does: Residue-free equipment, ready for the next batch.
Though, the following are commonly performed CIP operations.
Meaningfully, a typical approach for developing a Clean-In-Place cycle is:
- Water Rinse
- Detergent Cleaning
- Post-detergent rinses.
Manual vs. Automated CIP
Before automation took over, everything was done manually:
– Cleaning solution prep.
– Rinsing.
– Even the measurements.
The result?
– Inconsistent cleaning.
– No two batches were ever the same.
Then came automated CIP.
– Same cleaning quality. Every single time.
Still stuck comparing them?
This table breaks it down better than a long debate.
| Manual Approach | Automation Approach |
|---|---|
| High product contamination chances | Reduced Product Contamination |
| Longer cleaning cycle times | Short cleaning Cycle Times |
| Increased regulatory concerns | Less regulatory concerns |
| Maintaining offline measurement systems | Replaced with online measurement |
| Longer production cycle times | Shorter production cycle times |
| Consistency and repeatability is a challenge | Similar cleaning effects every time |
| Chemical exposure to operating personnel | Exposure free operations |
| The trouble with resource optimization | Resources such as WFI can be optimized effectively |
How to Design Clean-in-Place Cycles that works?
Effective cleaning is a science.
You need to understand two things:
- How your cleaning agent behaves
- How it interacts with your equipment surface
Miss either, and residues stay behind.
Here’s a step-by-step breakdown of what really matters.
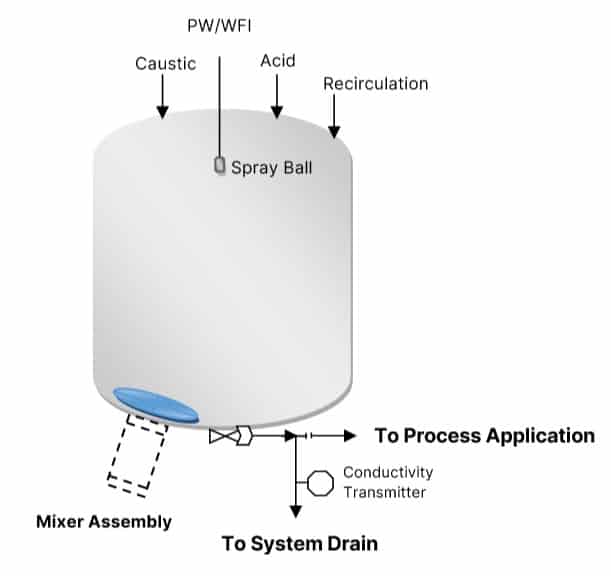
1. System Design
Pick a system that wants to be cleaned.
- Use minimal dead legs (ASME BPE is your friend)
- Slope pipes toward drain points
- Ensure full spray coverage of a cleaning agent
- Break complex piping into smaller, cleanable loops
2. Process Planning
Know your product’s residence time.
- Estimate the time a product spends in the equipment and time it takes to transfer to the next system.
- Based on this, decide whether you want to go a single equipment CIP or CIP of equipment along with the transfer line. A common way is to consider equipment CIP along with the transfer line. Because it reduces the overall production turnover.
3. Piping Design
- Select the piping clusters that avoids major pressure drops by correctly estimating pipe sizes and lengths.
- Ensure the each selected piping cluster includes a low-point gravity drain.
4. Characterize the Residue
- Conduct cleaning studies or take lab-scale cleaning data to begin the residue characterization.
- Develop the parameters targetting the product-contact surface areas. Evaluate the most effective cleaning agent.
- Identify the worst-case residues, CQAs and CPPs for a cleaning process.
- Once the cleaning parameters identified, combine the CIP for similar cleaning parameters to save the time and effectively clean the system.
5. Automation-Based Design Approach
- Sequence should start with WFI/PW/PoW rinse followed by detergent cleaning and finally post-detergent rinses.
- Include draining sequence in between the rinses to systematically isolate different cleaning agents.
- Finally, Air blow step is suggested post-draining for faster gravity drains.
- Define clear triggers for each step:
- Time
- Temperature
- Conductivity
- Detergent concentration
- Agitation
Follow these steps and you’ll save hours of rework.
And dozens of failed trials.
Automated Cycle: Starts with the Right System Setup
To get automation right, first know what you’re automating.
There are two types of CIP systems:
1. Mobile Systems
- Move freely on the shop floor
- Ideal for multipurpose areas or when flexibility is key
- Great for startups or pilot plants
2. Stationary Systems
- Fixed directly to the floor
- Integrated with the main manufacturing line
- Best for high-throughput, large-scale production
Know the setup.
There are two ways to run a Clean-in-Place cycle:
- Using a CIP Skid
- Using an In-Built CIP Cycle
In pharma manufacturing, process setups are anything but simple.
Piping clusters. Multiple vessels. Tight integration.
That’s why cleaning needs to be just as smart.
You’ve got two routes:
- Dedicated CIP – Cleaning a single system with its own recipe
- Integrated CIP – Cleaning multiple systems using a shared sequence
Let’s simplify this.
We’ll focus on in-built CIP for a dedicated process vessel.
Same cleaning steps. Just built right into the equipment.
Next up? How those steps actually work.
Just to give you a rough idea.
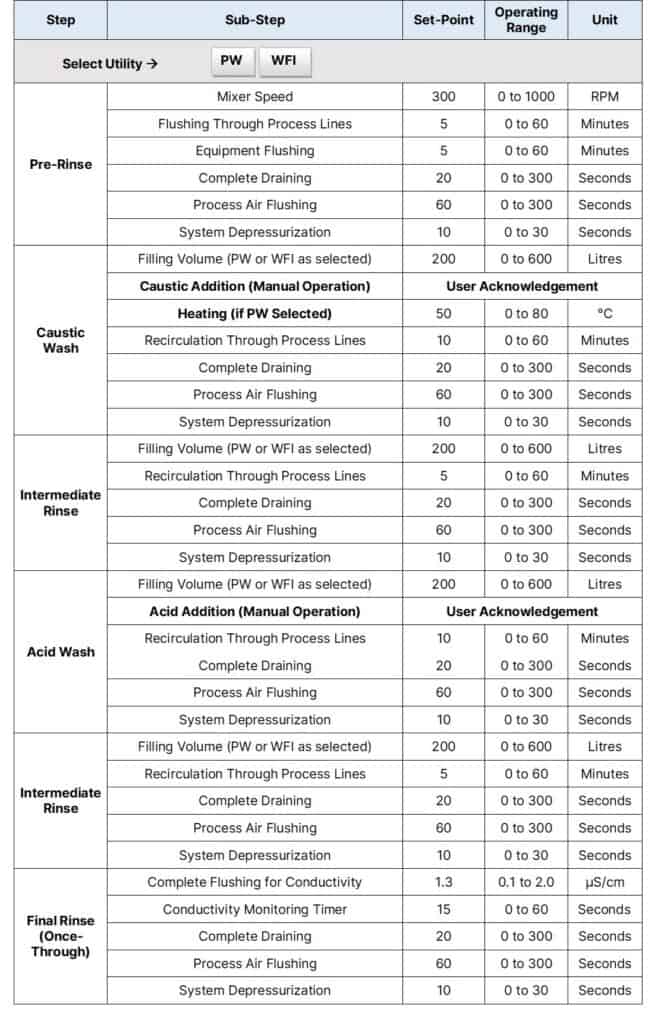
Recipe Based Approach
A recipe is a step-by-step operation that behaves as per user set points.
You manage the recipe effectively, it will manage the outcome effectively.
For example, a typical recipe for the CIP of a 600L working volume process vessel looks like this:
Whether you’re using a CIP skid or an in-built system, pre-checks are non-negotiable.
Here’s what needs to happen before the recipe kicks in:
✅ I/O testing complete
✅ Cleaning agents are available
✅ WFI or other clean utility is pressurized
✅ Drain lines are connected
✅ Equipment is empty and tagged “To Be Cleaned”
Using a CIP skid handles the acid and caustic dosing for you. But that doesn’t mean you skip the checklist.
Once your system’s ready…
Recipe loads.
Cycle starts.
Clean happens.
Execution
Once the recipe loads, it’s go time.
The utility you select drives the show.
Purified Water
You’ll need to heat it up during the caustic wash.
Why? Because high pH cleaning needs high temperature punch to break down sticky residues.
Using WFI
It’s already hot, around 80°C, so no need to heat or include it in the recipe logic.
Keep the mixer running. Just make sure it’s not spinning dry.
✅ Add a minimum working level interlock.
That one step protects your mixer and your budget.
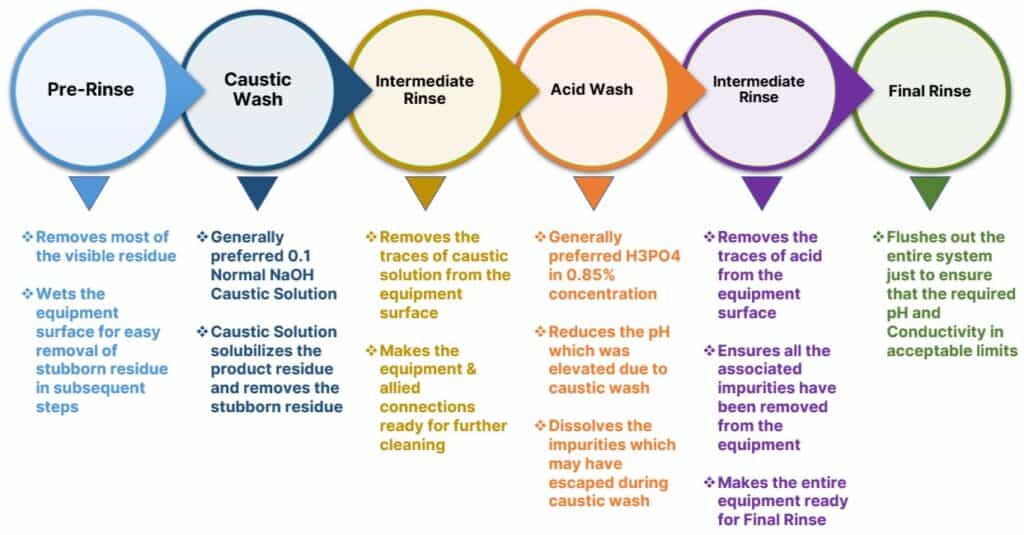
Step 1: Pre-Rinse
- Start with PW or WFI.
Push it through the main header, then down to the sub-header.
This is your first sweep. - The rinse hits the vessel and process lines.
Big chunks of residue? Gone.
This is a one-pass flush, no recirculation here. - Watch the exit.
A turbidity meter on the drain line tells you if the job’s done.
If it’s clear, you’re good. - Then flush the system with process-grade air.
Why? To chase out leftover moisture.
Once the pressure drops, the system is clean and dry.
And ready for the next move.
Step 2: Caustic Wash
Also known as alkali wash.
- Start by filling the vessel with PW or WFI up to the set level.
Then dose caustic to prep a 0.5N NaOH solution. (We’ll cover the exact method to make that later.) - If you’re using PW, heat it.
Target: 60 to 80°C.
Use the jacket and the right heating medium.
Skip this if you’re using hot WFI. It’s already near 80°C. - Once the caustic is ready, it’s time to recirculate.
Push it through every process line.
Let it run for the full exposure time. Why? To break down and lift off all residue stuck to product-contact surfaces. - After the timer’s up, drain the system. Fully.
- Then blow process-grade air through every path. No moisture. No leftovers.
Once depressurized, the system’s primed for the next phase.
Step 3: Intermediate Rinse
- Fill the vessel with PW or WFI to the set point.
Then recirculate.
Use the exact same path used in the caustic wash.
Why? To pull out every last trace of caustic and residue. - Let the rinse run its full course.
- Once done, drain the system completely.
- Now flush the entire setup with process-grade air. This removes leftover moisture and gets the internals dry.
- After that, the system depressurizes.
Ready for the next phase.
Step 4: Acid Wash
- PW or WFI is filled to the set point.
- Acid is added to prepare 0.05N Ortho-Phosphoric Acid solution. Explained further on how to make it 0.05N.
- It is then recirculated through process lines for a set time. Protein residue that may have escaped from caustic wash gets removed here.
- After recirculation, the system is drained completely.
- Upon complete draining, process-grade air is flushed through the system to ensure no moisture remains inside the surface of the piping and equipment.
- The system then depressurizes and gets ready for the next step.
Intermediate Rinse
Similar to the previous intermediate rinse.
Final Rinse (Once-Through)
- The system and process lines are flushed with PW or WFI and drained simultaneously for a set time to remove all the residue of cleaning agents accumulated during cleaning.
- pH and conductivity are monitored during flushing. Sometimes, conductivity can dictate that equipment and associated process lines are free from any residue.
- The conductivity of less than or equal to 1.3 µS/cm will terminate the cycle upon successful monitoring for the set time.
- Once the conductivity is achieved, the system is drained completely.
- Upon complete draining, process-grade air is flushed through the system to ensure no moisture remains inside the surface of the piping and equipment.
- The system then depressurizes and gets ready for the next batch.
That’s it. CIP complete.
Intermediate rinses?
They’re like an extra safety net.
Optional, but powerful.
But here’s the real deal:
If your cleaning parameters fall outside the acceptable range… Don’t speculate.
Run the cycle again.
Clean is clean. Almost clean is non-compliant.
What really makes a CIP cycle valid?
Not just running it.
Proving it worked.
That’s where critical process parameters come in.
Here’s what you track in every validated CIP cycle:
✅ Flowrate
To ensure the cleaning solution hits every corner of the system.
✅ Pressure at Utility Supply
If it drops too low, cleaning efficiency tanks.
✅ Temperature (and sometimes pH)
Heat + chemistry = effective residue removal.
✅ Acid and Caustic Concentrations
Too weak? No cleaning.
Too strong? Equipment damage.
Precision is key.
✅ Acid and Caustic Contact Times
It’s not just what you use.
It’s how long it stays in contact.
✅ Final Rinse Conductivity
Confirms there’s zero leftover cleaning agent.
No foam. No residue. No surprises.
✅ Sometimes TOC
Total Organic Carbon helps verify trace removal
Especially for high-potency APIs.
Bottom line?
A successful CIP ends the way it should:
With rinse water as clean as your WFI spec.
No residue
No doubts
No do-overs
That’s how you validate cleaning.
Velocity = Cleaning Power
Want killer cleaning results?
Target a flow velocity between 1.5 to 2 meters per second.
Why?
Because less than 1.5 is a laminar flow – weak and ineffective.
More than 2 is a waste of energy. No extra cleaning boost.
Pro Tip:
Install a flowmeter at the recirculation pump supply.
Monitor velocity.
Stay in the sweet spot.
Clean smarter, not harder.
The Right Cleaning Agent Changes Everything
Not all residues are created equal.
And neither are your cleaning agents.
For most pharmaceutical setups:
0.5N NaOH = your go-to caustic.
0.05N OPA = your acid rinse.
They handle proteins and typical residues like a pro.
But here’s the twist…
They don’t remove scaling.
That’s when you bring in the big guns:
Peracetic acid or Nitric acid.
Used during passivation, they clear the crust; fast.
Bottom line?
Match the agent to the residue.
Or risk an ineffective clean.
How to prepare 0.5N Caustic Solution?
Want a 0.5N NaOH solution?
Here’s the formula:
20 grams of NaOH per liter of Purified Water.
So if your cleaning volume is 50 liters:
20 × 50 = 1000 grams of NaOH.
Done.
Need the shortcut?
Grams of NaOH = 20 × Cleaning Volume
Easy with solids like NaOH.
But acids? Covered that next.
How to prepare 0.05N Ortho Phosphoric Acid?
0.05N OPA is the go-to acid for most CIP cycles.
Especially when proteins or minerals are part of the cleanup.
Here’s the math you need:
Volume of 85 percent OPA required (ml)
= 1.137 × Total Volume of Cleaning Solution (L)
Simple. Fast. Accurate.
So if you’re prepping 50 liters:
1.137 × 50 = 56.85 ml of OPA
That’s it.
But remember:
The cleaning agent must prove it works.
Not just sound right on paper.
Test. Validate. Trust the results.
Find Optimization Opportunities
Just because a CIP cycle works…
Doesn’t mean it’s optimized.
Most companies set it and forget it.
That’s a mistake.
You need to track.
Trend.
Tweak.
Monitor cycle performance regularly.
Look for overkill.
Spot inefficiencies.
Find ways to save time and money, without compromising cleanliness.
Then?
Update your recipe.
Cut what’s not needed.
Dial in what works.
Because excessive cleaning is just wasted time and chemicals.
Smart teams study what they’ve already got…
And make it better.
Riboflavin or Spray Ball Coverage Test
Purpose:
This test is used to evaluate the cleaning effectiveness of the spray ball for particular equipment. Moreover, to ensure the cleaning in blind spots of the equipment created by shadows due to agitator, baffles, nozzles, mechanical fittings, etc.
Scope:
This cleaning pattern applies to the Cleaning In Place (CIP) of process vessels, mainly demanding documented evidence of cleaning effectiveness.
Pre-requisites:
- As part of the procedure, equipment must already be cleaned to avoid false reporting of fluorescence under ultra-violet light.
- Riboflavin solution with the required quantity filled into the spray device. Prepare Riboflavin solution by dissolving 1 gm of Riboflavin in 10 Lit. water for 100ppm solution.
- CIP Pump on the supply side to deliver at least 2.5 to 3 bar(g).
- Electropolishing has been completed and approved.
- Availability of pressure gauge, flow meter, and control valves.
- Identify and define critical or worst-case areas of the equipment.
Background:
Riboflavin is most widely used for this test. It is a yellow vitamin that gives fluorescence under UV light. It is mixed with water and sprayed on the inside surface of the equipment being tested for cleanability. Rinsing is then delivered through the spray ball in a burst-rinse method.
Maintain the designed flow and philosophy of cleaning when performing the riboflavin test. The cleaning in place cycles must run under the bracketing of system design to confirm the results as repeatable.
Procedure:
Steps to perform riboflavin testing:
- Spray the solution on the inside surface of the equipment including all critical areas.
- Perform cleaning through a spray ball at the specified flow rate, time, pressure, and frequency.
- Inspect visually with the help of UV light for any fluorescence post-cleaning.
- Note down the observations and conclude as pass/fail.
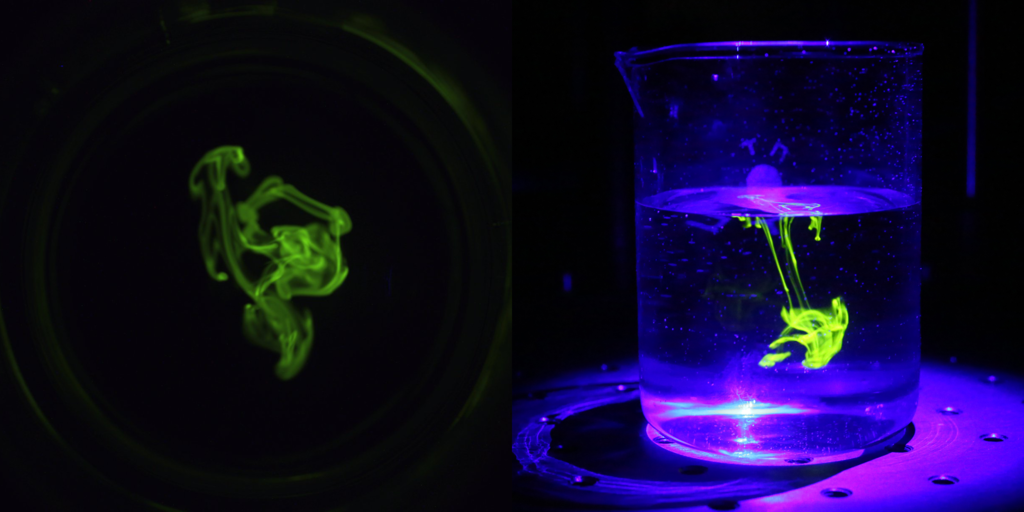
If riboflavin is still present post-cleaning, then it would appear like the below picture under UV light and the cycle would be considered a failure. Else pass.
Final Thoughts
Automated CIP is a necessity.
Yes, the tech has evolved.
But the fundamentals are still rock solid.
Design.
Execution.
Verification.
Each step matters.
What you’ve seen above is just the surface.
Real precision comes from system-level design and real-world application.
Now I’ve got a question for you:
Still cleaning manually?
Or is your CIP cycle smart, repeatable, and automated?
Let me know in the comments.
Let’s talk clean.


Hello Saket: Thanks for sharing the CIP article, I am working in a small OTC and cosmetic manufacturer that needs to comply with FDA cleaning and validation; as the batching is completed, vessels and filling lines are cleaned for next production batches; in 15 years there were no mayor contamination issues, with the company growth and post COVID-19 concerns, we would like to update our protocols. If possible could you refer us reading material leading to latest requirements, sort of the must have Cleaning and Cleaning Validation SOPs? Thanks in advance! FP
Thank you for the thoughtful comment, FP. You’re in a critical phase; scaling up while tightening compliance.
Here’s what I’d suggest:
1. Start with FDA’s 2011 guidance on “Process Validation” – Still the backbone for cleaning validation principles.
2. PIC/S PI 006-3 is gold – Gives a practical framework for cleaning validation lifecycle.
3. ISPE’s Cleaning Validation Guide (2nd edition) – Adds system design and automation relevance.
4. Build core SOPs around:
• Equipment Cleaning (manual and automated)
• Visual Inspection
• Cleaning Hold Time
• Recovery Studies
• Cleaning Validation Lifecycle Management
Feel free to reach out if you want templates or a walkthrough tailored to OTC and cosmetics. Would be glad to help.
Hello Dear,
I’m Ehsan Rad from Iran, can you share with me some documents to Cleaning Validation Methods? Because I’m working in the Quality department of the pharmaceutical industry.
Best Regards.
Thank you, Ehsan.
For someone in Quality, it’s smart to build your reference library. Here are must-have documents:
1. FDA’s Guidance for Industry – Process Validation (2011)
Explains cleaning validation as part of lifecycle.
2. PIC/S PI 006-3 (2021)
Best global guide on cleaning validation – covers protocol, visual limits, and risk-based approaches.
3. WHO Technical Report Series No. 1019 (Annex 3)
Good for resource-constrained setups. Simple, direct.
4. ISPE Cleaning Validation Guide (2nd Edition)
Detailed, but worth it if you’re dealing with automated systems or CIP/SIP.